Welcome to our blog!

May Community Academy's 5th and 6th grade students are fortunate to be recipients of a 1:1 iPad initiative. Please follow our journey!

Wednesday, November 9, 2011

Linking First Class Accounts to the iPad Mail Icon


All students in grades 5-8 enrolled in Chicago Public Schools have access to the collaboration tool First Class which includes an email address for students to collaborate and communicate with other students and teachers within the system.  As we've continued down our journey of iPad integration in our 5th and 6th grade classrooms we've come to the conclusion that student emails needed to be linked to the mail app.  This is not an easy process.

Thanks to Ms. Kelly and Ms. Shea from Brownell School for walking us through the steps.  Here she is...in all her glory.

Step 1:  Before even attempting to configure the iPads a couple of things need to be in place.  To begin, each student needs to have an active First Class account.  CPS has started to deactivate accounts if they haven't been utilized in an extended period of time.  A call to Tech Excel to ask them to activate all school accounts was unsuccessful.  What was needed was an excel spreadsheet which contained the name, username, and I.D. for every student in 5th and 6th grade.  This took a minute to compile.  After it was complete the process involves calling Tech Excel to open a ticket.  When this is done I was instructed to send the excel spreadsheet to cpssdteamleads@cps.k12.il.us.

Step 2: While waiting for Tech Excel to make sure all accounts were active I proceeded to the next step.  I needed to create a new email account to serve as my "outgoing" mail server.  First Class won't work as the outgoing server (don't ask me why).  I set up a gmail account.  Its my understanding that all of the emails students send to others from their iPads will show up in this account.  This will help to cut down on the emails that may not be related to education.  All of the teachers involved in this initiative will have access to this account.

Step 3:  Begin by selecting the mail icon on your iPad.  You'll see a "Welcome to Mail" screen that gives you choices such as Microsoft Exchange, Gmail, Yahoo, Aol, etc.  I selected "other".

Step 4: The next screen asks for your name, email address, password, and description.  This is where the students would input their First Class information and select 'next'.


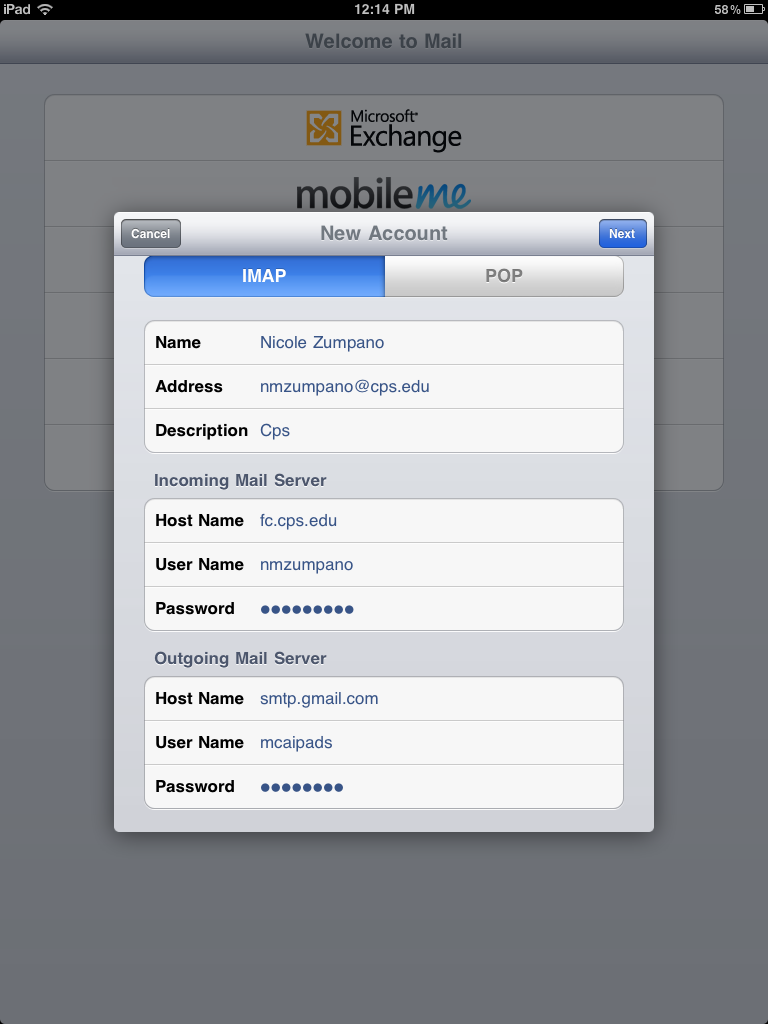
Step 5: The next screen should have "IMAP" highlighted in blue at the top.  The First Class information entered on the previous screen is already populated in the first section of this page.  For the Incoming Mail Server section enter fc.cps.edu.  You enter your First Class username and password as well.  For the Outgoing Mail Server you enter "smtp.gmail.com" (if Gmail is the email you set up).  Enter the username and password for that account.  Select next.  You'll see a "verifying" prompt at the top of the page.  This will take a few minutes.  A prompt may come up for IMAP that has the mail radio button 'on'.  Select 'save' to have the account added.  If you happen to get a pop up that says "Cannot Verify Server Setting" select "continue" and proceed.


Step 6: There is one final step to check.  After the account has been added click the Home button.  Click on Settings.  Select Mail, Contacts, Calendars.  Under "accounts" near the top select "Cps".  This will bring you to an IMAP screen.  Select Account to see the IMAP Account Information.  Select "Advanced".  Make sure SSL is turned on.  Happy iPad emailing!


Tuesday, November 1, 2011

One to Watch: Flashcardlet

Looking for a way to develop flashcards for your students to use on the iPad?  How about using flashcards that have already been created by someone else?  Flashcardlet is a free application that allows you to do those things easily.  This application allows users to create a front-and-back flashcard from scratch.  It allows you to copy or combine decks or to download (and modify) flashcard sets from Quizlet that were made by others or made by you (make sure you make your sets public for this to work).

If you are unfamiliar with Quizlet it is well worth a peek.  This free Web 2.0 tool has features where students can study flashcards, be tested online, play games to help with mastery, and allows a quiz to be custom designed (true/false, multiple choice, written, etc.).  All features of the site work on iPads.

If you would like to learn more about how to use Quizlet take a look at this tutorial (originally designed for Social Studies teachers).  

Wednesday, October 26, 2011

One to Watch: Show Me

As we are progressing with our integration of the iPads there are applications that come along and seem to fit into our program with ease.  Show Me (free) is one of these apps.


Show Me is an interactive whiteboard for your iPad.  Students can record a voice-over as they are demonstrating a concept.  For example, in mathematics students can solve a math problem and explain the steps they are taking as they do so.  In music students can demonstrate the knowledge of notes.  For science students can draw a picture of a cell and describe it or chose an existing picture of a cell and label the parts.

Within the app students can draw or write using black, grey, red, blue, green, orange, or purple. They can erase individual components of their board or erase the entire screen at once.  Photos can be inserted.

These short clips can then be uploaded to the Internet for public or personal viewing.  The finished products can be embeded in a blog, a wiki, or on a website.

The steps detailed below explain the process of posting and embedding your Show Me creations!


On the iPad:

Install and launch the Show Me application.  Create your own short clip by pressing the record button and drawing on your whiteboard.  When you finish a menu will appear asking if you want to name and
save your clip. After you complete this step it will prompt you to upload your Show Me clip to the Internet allowing for public (within their directory) or private (viewable by only those you share the link with) views.    If you don't have an account you can create one from the iPad or from your computer.


On the Internet:

1. Visit Show Me's website at http://www.showme.com/


2. If you are new to the site click the "sign up" link and create an account.  After you have an account you'll select the "login" link.

3.  Once you are logged in click on the "my profile" link near the upper righthand corner. 

4. From here you will see all of the Show Me clips you have uploaded from your iPad.  Select one of your clips. When selected the video rendering process begins automatically.


5.  After your video is rendered and ready to go you will see a screen where it can be played right away.  You can also edit the settings (title, description, etc.).  If you are interested in embedding your Show Me clip click on the "embed" option and copy the code.


Examples of an embedded Show Me clip are below:


Here's a link to another blog post on using Show Me:

Thursday, October 20, 2011

Internet Safety Reflections

During our Internet Safety Presentation we learned ten tips about staying safe on the Internet:


  1. Anything posted on the Internet can be traced back to the sender. 
  2. Once it's online it can stay there forever (or be altered or passed around). 
  3. Always log off of accounts even on your own personal devices. 
  4. If you wouldn't say it to your parents or teachers don't say it online!  
  5. Don't post pictures of yourself or your friends on the Internet. 
  6. Never post your full name online (stick to your first name/last initial). 
  7. Think before you post! Don't let anger or frustration cause you to post something you will later regret. 
  8. Block and report anyone you feel is threatening you. Tell a trusted adult right away. 
  9. Don't open emails from people you don't know. 
  10. Don't be mean! 


 Which of these tips do you think is the most important? Do any of them mean something to you?

Internet Safety at MCA

Internet Safety is everybody's business!!  Below is a presentation that was shown to our 5th & 6th grade classrooms to make sure they stay safe on the iPads.  If you can't view the presentation below it can be found at http://prezi.com/b3vxxlfei4n4/online-safety-at-mca/.  If you are interested in seeing the information and contract that was sent home to parents please visit http://www.scribd.com/fullscreen/70104499?access_key=key-zx2omjg78v9otp8dq2i


Monday, September 12, 2011

Student Survey CPS

Hi Students. As you know May Community Academy is fortunate to have iPads due to a grant we were awarded through Chicago Public Schools. Last week you took a survey for us, this week you need to take a survey for CPS. Please follow the link below to get to the survey.

https://docs.google.com/spreadsheet/viewform?formkey=dHdxcnZfdFBXeTVta3JyNGtpeFZXcFE6MA

Tuesday, September 6, 2011

Rolling out the iPads

Today was the first day of iPad roll out at May Community Academy.  The teachers and I have been meeting on a regular basis to establish procedures for this week.  Ms. Beckom's 6th grade class, room 203 were the first to receive the iPads.

Today the iPads were brought up by me in bags (7 per bag).  Ms. Beckom had the students make signs that listed their name and iPad number prior to my arrival.  These would be taken with a photo of each student and made the background for each iPad.  This provides more ownership by each student and makes it quick to identify who's iPad belongs to whom.


When I arrived I simply had to call out an iPad number such as B-7 and the students came up to collect their iPad.  The distribution went smoothly.  I demonstrated for the students the basics: home button, using the camera, maps, how to zoom, and volume control as well as how to save a picture as a background. Students quickly adapted to the iPad and found Photo Booth right away.  They seemed to enjoy browsing through the other apps, stopping to practice math facts in the Math Ninja app!

The final part of today's roll out was to take the iPad survey embedded as a post in this blog. This is a survey unique to MCA; they will complete iPad grant surveys later in the week.  The plan is to take screen shots of the survey results and allow students to interpret data based on the responses of their classmates.  Check back in a few weeks for that post.  

Three students (along with 3 alternatives) were chose to be responsible for picking up, distributing, collecting, and reconnecting the iPads daily.  Those students did a great job today!